I said a few days ago that I would tell you more about making friendship bracelets.
Like this one and others.
First the ones I started on.
Over the school holiday people bring their children to the craft group I go to and a few weeks ago one of them was making friendship bracelets. I asked him what you did and he showed me.
Now he was using ordinary acrylic type yarn and told me that you needed three pieces of yarn doubled and one single length. (about 16 inches). These were arranged round an octagon with slits in the middle of each side so seven threads left one free. The idea was to take a strand and then jump over two strands into the empty one.
When I reflected on this I knew that when using seven threads it was just too tempting to make them rainbow colours, so I ignored what he said about doubled threads and using one of my octagonal drinking glasses as a template cut out a piece of cardboard and decided to use my cotton yarn which I had in rainbow colours as I thought it would make a better finish.
I worked out that if I arranged the threads like this

I would be moving the coloured strands in rainbow order and hopefully that meant that they would appear in that order on the finished bracelet.
Here is my first bracelet.

The colours were in rainbow order but in an end to end fashion.

You can also see that I have not yet managed to get an even tension!
So I looked at how the colours arranged themselves side to side and came up with this arrangement as a starting point.

I then made another bracelet

And this time the colours were as I wanted them.

Fired up, I then went on the internet to see how to make the flat friendship bracelets I had seen for sale.
The flat ones, that go back to the North Americal Indians, looked to be much too fiddly for me to manage but I discovered that the Japanese had something similar to what I had done already called ‘Kumihimo’ which had been used in the past, among other things, by Samurai warriors to fasten their armour.
I discovered a site http://www.homemade-gifts-made-easy.com/how-to-make-friendship-bracelets.html which gave instructions on making these plus templates for different patterns and a link to another site http://craftdesignonline.com/kumihimo/kongoh-gumi-friendship-bracelets/?cdokb_s= where you can design your own. This site also describes ways of making other styles of braid that I have yet to try.
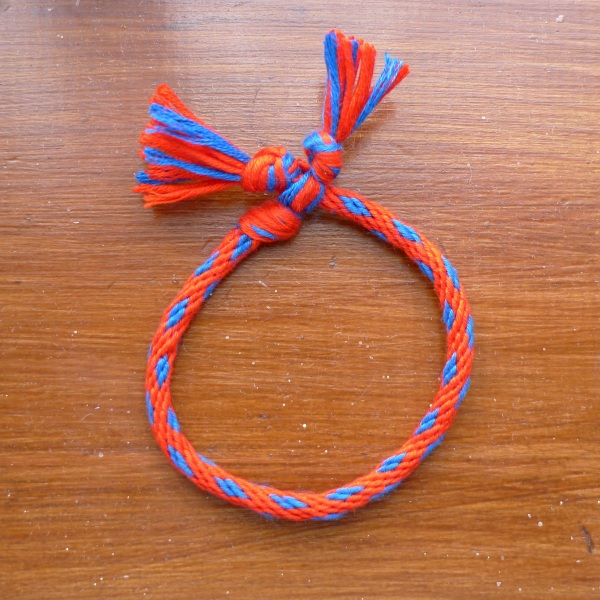
The bracelet I pictured at the start was made using this disc.

I have since started another one. Here you can see how the strands are arranged at the start.

Which gives this pattern

Both types of bracelet are very easy to make. The first requiring just one repeated step the other only three.
The first web site I mention suggests that to finish the bracelet you tie two knots half an inch apart and thread the starting knot through. I my opinion it is better to tie one knot then separate the threads equally either side of the starting knot and tie the second knot so you can’t get the starting knot out,

Very nice 🙂 Thanks for sharing how you made them.
Blessings 🙂
LikeLike
Thanks!
LikeLike
I used to make all sorts of flat friendship bracelets as a kid, and I loved it. I used embroidery floss for those, though–is that what you’re referring to as “acrylic yarn,” or is it something different altogether? The round ones look really interesting. As you are creating the bracelet, where does the twisted cord go as you continue to work around the octagon? Are you pulling it down through the middle, or is it forming on top of the cardboard?
LikeLike
The websites I found suggest embroidery threads. By acrylic, I meant ordinary DK (US 8-ply) yarn. You ease the cord down through the middle as it forms.
LikeLike
very very pretty, but I don’t know about easy – maybe for you! Doesn’t look easy at all. Have you seen ALice’s blog, http://knitnrun4sanity.wordpress.com? She’s also been kumi-whatsitting.
LikeLike
Well my 10 year old grandaughter can do them! 🙂 Will look at Alice’s blog. Thanks.
LikeLike
I think you already have this but I nominated you anyway!
http://onoodlesstitchcraft.wordpress.com/2013/09/07/darling-beloved-liebster/
Love your blog!
Jill x
LikeLike
So very kind of you. I will go and look.
LikeLike