Having seen people posting about hanging rainbows in windows, I finally decided to make one myself.
Of course in the bible, you find a rainbow at the end of the story of Noah and the ark, where it is a sign of hope for the future. Rainbows when seen are incredibly beautiful and both of these things led me to love Rainbows.
Rainbows as a sign of hope for the future is a very appropriate theme for out present situation.
I have been a little distressed when I have seen adults creating rainbows with random colours but not so when it comes to children because I myself, although I knew the correct colour sequence had difficulty remembering which colour was at the top.
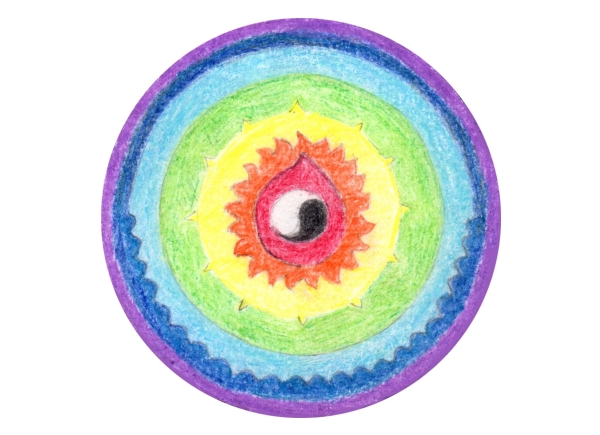
My avatar however does not have purple as the outside curve because I didn’t know which way the colours went but rather because it is a mandala that represents the earth. So of course the red and the orange represent the earth’s molten core, the yellow the rocks and soil, the green the biosphere, especially living plants, the blue represents the sky and the rivers with the darker blue (indigo) for the sea and night sky and the purple (violet) for all that lies beyond both physically and spiritually.
I will share my Rainbow Pattern with you in case anyone is looking for one to use. Though there are many ones out there.
My rainbow only has six colours not seven, basically, because I had only bought six colours in this yarn. But since blue and indigo are both really different blues I think this will have to do. 
So here is the pattern
It is based on my “How to Crochet a Perfect Circle” pattern
(I have checked and double checked but if anyone notices what looks like a mistake do let me know.)
The pattern is written in UK terms but just replace dc with sc and you have a US one.
This could be made with any yarn and I don’t think that tension should be an issue. I used a cotton yarn that appears to be about Aran (Worsted) weight where the recommended hook size is 6-7mm. I used a 6mm and it came out about 8 inches – 20 cm across.
I have written the pattern so that you can either use six colours as I did. Purple, Blue, Green, Yellow, Orange, Red or the conventional Violet, Indigo, Blue, Green, Yellow, Orange, Red. For this reason I only say “change colour” without specifying which colour comes next.
For each round either one or two dcs are worked into each stitch of the previous round. The sequences of these are indicated by the details in the brackets.
Using purple or violet yarn.
Leave a long tail to sew the lower edge together at the end and
Make 32 chain. slip stitch into the first chain to join. Do make sure that the chain lies flat and doesn’t contain a twist.
Round 1: ch1 (for height) then repeat (2dcs, dc) 16 times. (48 sts) First dc is worked into same stitch as slip stitch.
Counting that you have the correct number of stitches, at least at the end of each odd round, is a wise precaution.
You now work in a spiral.
Marking the first stitch of the even rows will help.
Round 2: Dc into each stitch.
Remember to complete the last stitch of the even rounds with the next colour.
Change colour
Round 3: Repeat (dc, dc, 2dcs) 16 times. (64 sts) The fact that the 2dcs alternate, between the beginning of the repeat and the end, is important to make the shape as round as possible.
Round 4: Dc into each stitch.
Change colour
Round 5: Repeat (2dcs, dc, dc, dc,) 16 times. (80 sts)
Round 6: Dc into each stitch.
Change colour
Round 7: Repeat (dc, dc, dc, dc, 2dcs,) 16 times. (96 sts)
Round 8: Dc into each stitch.
Change colour
Round 9: repeat (2dcs, dc, dc, dc, dc, dc) 16 times. (112 sts)
Round 10: Dc into each stitch.
Change colour
Round 11: repeat (dc, dc, dc, dc, dc, dc, 2dcs,) 16 times. (128 sts)
If you are only using six colours this next will be the last round
If you are using six colours
Before this last row, sew the ends in on the wrong side, except for the starting tail. They will be inside so all you need to do is to make them secure and neatly out of the way.
Row 12: Dc into first stitch, then fold the circle in half and for the next stitch dc into both the next stitch at the front and the stitch three stitches before at the back (you miss out two stitches at the fold.) Continue with dcs into both following front and back stitches until you get to the last two (one front, one back). Cut the yarn and use to finish off into the last two stitches. (62 sts)
If you are using seven colours
Round 12: Dc into each stitch.
Change colour
Round 13: repeat (2dcs, dc, dc, dc, dc, dc, dc, dc) 16 times. (144 sts)
Before this last round, sew the ends in on the wrong side, except for the starting tail. They will be inside so all you need to do is to make them secure and neatly out of the way.
Row 14: Dc into first stitch, then fold the circle in half and for the next stitch dc into both the next stitch at the front and the stitch three stitches before at the back (you miss out two stitches at the fold.) Continue with dcs into both following front and back stitches until you get to the last two (one front, one back). Cut the yarn and use to finish off into the last two stitches. (70 sts)
To finish
Sew in the end of the red yarn so it can’t be seen. Note that because of the last row the rainbow does have a front and back.
Then use the starting tail to pull together both sides of the lower edge.
Now you can attach your rainbow wherever you want it.
My front of the house, kitchen, window is not an easy one to hang things in and in the end I had to resort to a method I saw someone else had used, of using a piece of sticky tape. (I hope it holds!).
The weather has become much colder and darker but here are a couple of quick photographs I took from the outside. 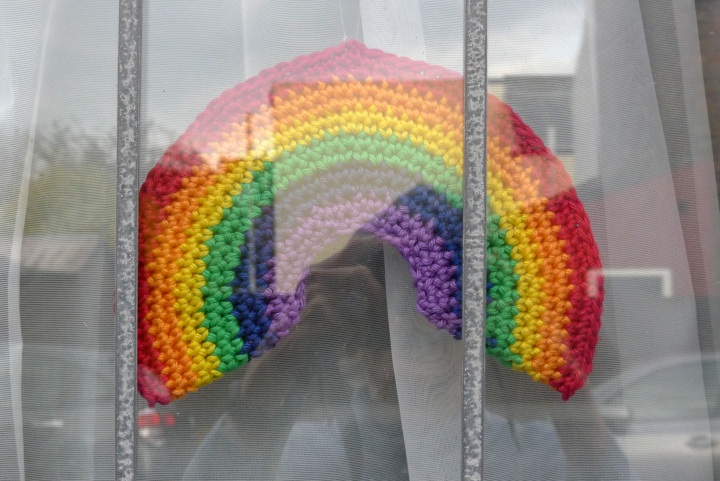
You can see my reflection and cars and houses across the street as well.
And a bit further back. 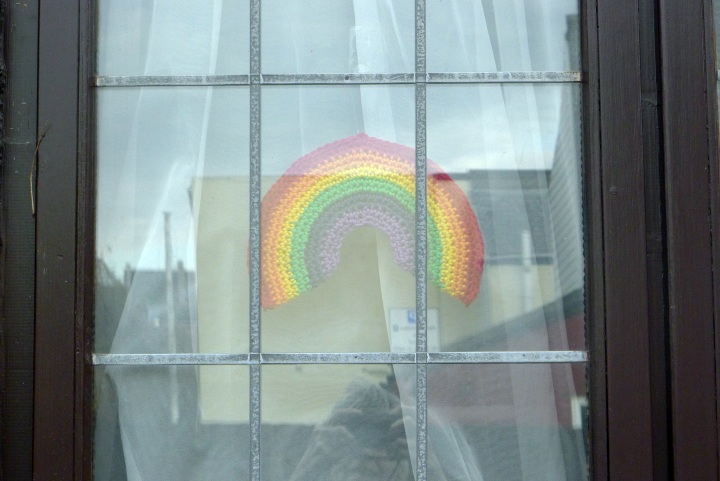 Not symmetrically placed, I realise, but it is going to have to do.

Both are beautiful. Love it!
I was only thinking today that I might hang the rainbow striped blanket, I am crocheting, in my window.
LikeLiked by 1 person
Sounds good. Is it very large?
LikeLiked by 1 person
Yes! Single bed size!, but the window is in the spare bedroom so it won’t matter blocking out the light.
LikeLiked by 1 person
That’s lovley! I think I may be having one delivered from the Grands soon too!
LikeLiked by 1 person
That sounds great!
LikeLike
That’s really lovely 🙂
LikeLiked by 1 person
Glad you liked it! 🙂
LikeLiked by 1 person
I’m picturing it possibly made up as a semi-circular rainbow cushion too – one big crochet circle folded over in half 🙂
LikeLiked by 1 person
Yes, you could do that but you would have to start in the centre with eight stitches. My ‘perfect circle’ will lie flat if made according to the pattern but needs a little stretching. However I notice that made this way it curves round to more than half. Might be interesting to see what happens if I based it on six stitches (so 24 to start the rainbow) instead.
LikeLiked by 1 person
Um… and maybe I’d put white in the middle, before the rainbow colours start proper? 🙂
LikeLike
Yes, that would be good. You would get a more rainbow shaped rainbow plus a semi circular shape for the cushion.
LikeLiked by 1 person
Gorgeous and thank you for the correct colour order 🌈
LikeLiked by 1 person
I was taught the ROYGBIV. ‘Richard of York gave battle in vain’ when I was a child!
LikeLiked by 1 person
Beautiful rainbow 🙂
LikeLiked by 1 person
Thank you! 🙂
LikeLike
oooh This is really lovely. I keep thinking that I need to make myself a rainbow for our window. 😀 I am just a little worried that I dont have the correct colours in my stash.
LikeLiked by 1 person
Having all the right colours can be a problem. In normal use I always find orange and violet are colours one is less likely to have.
LikeLiked by 1 person
Sorry please ignore previous posting ,except that I love your rainbow. I understand it now ans going to mqke several for my family and friends or until my wool runs out. Thank you.
LikeLike
Glad you like it. Hope your family enjoy the ones you make.
LikeLike
Just made one, and it has come out beautifully! Thank you!
LikeLiked by 1 person
Thank you. So glad to know you found it helpful.
LikeLike